Users attempts to delete Group (List > Relationships > Groups > Edit Group > Actions > Delete) returns: This record cannot be deleted because it has dependent records.
Any Group which has been used to Bulk Merge operation or Marketing Campaign cannot be removed anymore.
Only one option is to inactivate the respective Group by marking Inactive checkbox on the Group record itself.
Note: Bulk Merge history is stored in Documents > Mail Merge > Merge History. Appropriate Group is displayed in Group column.
Marketing Campaigns are saved under Lists > Marketing > Marketing Campaigns.
Tuesday, April 30, 2019
Recurring Billing: Use of Minimum Term in the Subscription Plan record
The Minimum Term becomes available for selection if the Term is set to Perpetual. It must not be shorter than and should be divisible by the Billing Frequency.
This will define the number of subscription charges to be generated upon create of subscription for a perpetual term.
Sales/ Sales Orders by Customer Summary Report Customized to Remove the Column Customer/Project: Name (Grouped) and Add Another Field as Column Results to Missing Sales Amounts
The problem is due to results being sorted with columns which are not available under Edit Columns.
To resolve without adding back the Customer/Project: Name (Grouped) column, user may do the following:
1. Access the report.
2. Click the Return To Customization button.
3. Click Sorting.
4. Under Choose Sort Order, remove the Customer/Project > Name(Grouped) from the list by clicking the x icon on the right.
5. Preview/Save the Report.
Note : Enhancement 194827 has been filed for this. The issue is due to a feature of pivot reporting engine when generating a summary report. Some of the rows are grouped by column not known to the pivot engine thus they are omitted because the system is considering them as duplicates.
Option to add Fedex International Mail Service (FIMS) as a Shipping Item
FedEx International Mail Service (FIMS) is a reliable, economical mailing solution for reaching a global audience. FedEx International Mail Service provides options that will streamline customers' business and help it grow. FIMS delivers with expertise and efficiency. FedEx does all the work so customers don't have to spend their valuable time and money processing mail and paying costly international postage rates (https://smallbusiness.fedex.com/international/mail).
Note: Enhancement # 266470 "FedEx Shipping Integration > Provide option for shipping method/item = FedEx International Mail Service (FIMS)" has been filed so that FIMS becomes available as a Shipping Item.
CyberSource Reason Code 102 due to invalid field (Bill to Postal Code)
Navigate to Transactions > Sales> Enter Sales Order
Mark Get Authorization
Result: An unexpected error occurred while processing the credit card through CyberSource (reason code = 102). Please contact NetSuite support.
CyberSource made changes on their data validation and it is rejecting special characters that are used in names; e.g. "_", "-", "+".
To resolve:
· Check if the Bill to Postal code is a valid postal code. If not, enter a valid postal code.
· Check if the Bill to Postal code has special characters. If special character/s are entered, remove the special character/s.
Company Name is printing twice in the Remittance slip
The information being pulled into the remittance slip is coming from the Name in the Primary Information section of the Customer record as well as the Addressee field found in the Address tab. Normally, the entries made on the Name and Addressee fields are the same.
To correct this, remove the entry on the Addressee field or at least, put in a different data and then click on the Override = T checkbox. Click Save.
Create a Saved Customer Search that lists Customers with No Primary Contact
To create the search, perform the following steps:
1. Navigate to Lists > Search > Saved Searches > New.
2. Click Customer.
3. Enter a Search Title.
4. In the Criteria tab, enter the following:
Contact (Primary) fields... : Name/ID is empty
Is Individual is false
5. In the Results tab > Columns subtab, add the following:
Internal ID
Name
Contact : Role
Contact : Name
Contact : Email
Primary Contact
6. Click Save & Run.
Update Contact Role through CSV Import
Note: Users must prepare a CSV file with the following details:
- Internal ID of the Contact records to be updated
- Internal ID of the Customer records associated to the Contacts
- intended Role for the contacts
1. Navigate to Lists > Import/Export > Import CSV Records.
2. Import Type = Relationships.
3. Record Type = Customers and Contacts Together.
4. Select the CSV file.
5. Click Next.
6. Set Data Handling = Update.
7. Click Next.
8. In the field mapping page, map the following fields:
Customer Internal ID <=> map to the Internal ID in the Customer Folder
Contact Internal ID <=> map to Internal ID in the Contact Folder
Role <=> map to the Attached Role in the Contact Folder
9. Click Next.
10. Click Run.
Update the Contribution % of Two Sales Reps in a Sales Team on Opportunity Transactions through CSV Import
To update the Contribution % of Two Sales Reps in a Sales Team on Opportunity Transactions:
I. Create an Opportunity Saved Search for all Opportunities to be updated:
1. Navigate to Reports > Saved Searches > All Saved Searches > New.
2. Click Opportunity.
3. Enter a Search Title.
4. In the Criteria tab > Standard subtab, enter the necessary filters.
5. In the Results tab > Columns subtab, add the following:
Internal ID
Sales Team Member
Contribution %
6. Click Save & Run.
7. In the results page, click Export – CSV.
8. Edit the CSV file so that each transaction will only appear as one line, for example:
Internal ID || Sales Team Member 1 || Contribution Percentage 1 || Sales Team Member 2 || Contribution Percentage 2
9. Save the CSV file.
II. Perform CSV Import:
1. Navigate to Setup > Import/Export > Import CSV Records.
2. Set the following:
Import Type = Transactions
Record Type = Opportunity
3. Select the CSV file.
4. Click Next.
5. Set Data Handling = Update.
6. Click Advanced Options.
7. Set Overwrite Sublists = True.
8. Click Next.
9. Map the following fields:
Internal ID <=> Internal ID
Sales Team Member 1 <=> Sales Team 1 : Employee
Contribution Percentage 1 <=> Sales Team 1 : Contribution %
Sales Team Member 2 <=> Sales Team 2 : Employee
Contribution Percentage 2 <=> Sales Team 2 : Contribution %
Note: In NetSuite Fields section, click the + sign beside Opportunity Sales Team to create the Sales Team 2 folder
10. Click Next.
11. Enter an Import Map Name.
12. Click Save & Run.
Update the Custom Form of Existing Leads, Prospects, or Customers Through CSV Import
To change the form of existing Prospects, Leads or Customers, perform the steps below:
Note: User must prepare a CSV file with the Internal ID of the records to be updated.
I. Set the Custom Form as preferred form
1. Navigate to Customization > Forms > Entry Forms.
2. Edit the custom form to be assigned to the records and set the following:
- Store Form With Record = True
- Form is Preferred = True
3. Click Save.
II. Run the CSV Import to update the Custom Form of existing records
1. Navigate to Setup > Import/Export > Import CSV Records.
2. Set Import Type to Relationships.
3. Set Record Type accordingly.
4. Select the CSV file and click Next.
5. Set Data Handling = Update.
6. Under Advanced Options, set Custom Form to the form in Step I.
Note: If the CUSTOM FORM field is not available it means that the forms available for the record type being imported has been disabled in the role of the user doing the import. Contact an administrator user to make the necessary changes to the role being used.
7. Click Next
8. Map the following fields:
Internal ID <=> Internal ID
9. Click Next.
10. Click Save & Run.
Reference My Account: Insert Footer Web Site tag in My Account page
- Requirements:
- Copy the index.ssp file from Reference My Account folder to Custom My Account Folder
- Refer to the SuiteAnswers article "Deploying SSP Application Touch Points" for the steps on how to deploy the Custom Checkout SSP Application
- Edit index.ssp
- Navigate to Document > Files > File Cabinet
- Navigate to Web Site Hosting Files > Live Hosting Files > SSP Applications > NetSuite Inc. - My Account > Custom My Account > Edit index.ssp
- Insert Web Site Tag at the bottom part before the last /DIV:
Example declaration:
Change Item's External ID
External ID of an item record is a standard field that cannot be modified through user interface. Modification can only be accomplished through CSV Import.
1. Create a CSV file, basic example is to add 2 columns:
a. Internal ID - internal ID of the item record to be updated. This can be located on the item record page under Store tab, or just by viewing the ID parameter value of the item record's URL.
b. External ID - enter value that needs to be added as item's external ID
2. Navigate to Setup > Import/Export > Import CSV Records
3. On Step 1 of the Import Assistant Page:
- Set Import Type = Items
- Record Type = Inventory Item (or which ever item record that needs to be updated)
- Upload CSV file
- Click Next
4. On Step 2, select Update then click Next
5. On Step 4 Field Mapping, make sure the Internal & External fields are mapped appropriately to the corresponding NetSuite fields. Click Next

6. Step 5, continue to save & start importing
To check if the external ID was updated, user can create an item saved search and display external id on the search result to see if item's id was successfully updated.
Display the Total Amount of Sales Created by a Sales Rep in Dashboard
1. Navigate to Reports > Saved Search > Saved Searches > New > Select Transaction.
2. In the Criteria tab > Standard sub tab > Add the following Filters:
- Type is Sales Order
- Sales Rep is (any of = select from the list)
- Main Line is true/yes
3. In the Results tab > Columns sub tab > Set the Summary Type to Amount = Sum.
4. Then, rename this search and click Save and Run.
5. Navigate to Home > Dashboard.
6. In the KPI portlet > Setup > click Add Custom KPIs button and select the saved search that was just created.
Item Used in Previous Sales Orders does not Show When Creating New Sales Orders
How to investigate:
1. Check if the item is set to inactive by navigating to Lists > Accounting > Items > Show Inactives = T.
2. Go to item record and in the System Information tab > System Notes sub tab > check the Date it was set to Inactive (from F to T).
3. Go to the Sales Order record where this item has been selected. Check the Date when it was created.
4. Compare the Dates in the two records and verify which created first.
Note: Only Sales Orders to be created after the date when the item was set to inactive will not be able to select the item.
Default Value on Sales Order Ship Date
The Ship Date field on the Sales Order is pre-populated even if the user does not select any value. This is important to note as the System Notes will show that a user "set" the value on this field when in fact this was never populated.
The default value of the Sales Order Ship Date is controlled by Setup>Accounting>Shipping>Preferences tab. By design Ship Date = transaction date + Number of Days to Shipment.
Special Cases:
1. Ship Date is blank when Number of Days is blank.
2. When Cutoff Time for Shipments is not blank then if the current time is after the cutoff time, one shipping day will be added to the calculated Ship Date.
3. When Ship on Saturday and Ship on Sundays is/are not checked then these days will be skipped.
4. When Shipping Holidays are defined then these days will be skipped. You can set Shipping Holidays under Setup>Accounting>Shipping>Preferences>Holiday Date.
Saved Search to Display Currency Exchange Rates in a Date Range
Currently, the ability to create a report to show the historical values of Currency Exchange Rate in a table format is filed as Enhancement# 149420. There are instances when users would want to use a simple monthly rate average of the Currency Exchange Rates to be used in the Consolidated Exchange Rate table and this report / search will beneficial.
As an alternate solution, users can create a Saved Search to show the Currency Exchange Rates for a given month / period. To illustrate, assume that a user wants to show Currency Exchange Rate from GBP to USD for April 2013:
1. Navigate to Lists > Accounting > Currency Exchange Rates > New
2. On the upper right side of the screen right above the page title click on Search
3. Click Create Saved Search
4. On the Criteria tab add the following fields:
· Base Currency = USA
· Transaction Currency = British Pound
· Effective Date is within 04/01/13 to 04/30/13
5. On the Results tab add the following fields:
· Base Currency
· Transaction Currency
· Exchange Rate
· Effective Date
6. Click Preview or Save & Run
Note that the results will show the Internal ID of the Currency and not the actual Currency Name.
Currency Used in the Revenue Recognition Schedule
There are instances when an account is using Multi-Currency for Customers and it is not evident on what currency is used on the Revenue Recognition Schedule. The ability to expose the Currency field on the Revenue Recognition Schedule is currently not possible.
The transaction (e.g. Sales Order) will use the Customer Record: Primary Currency. However, the GL Impact will use the Subsidiary: Currency. On this note, the Revenue Recognition Schedule will also use the Subsidiary: Currency and not the Customer Record: Primary Currency to ensure that the financial impact offsets each other when the transaction is invoiced.
To illustrate:
- Assume that Multi-Currency for Customer is turned on for the account.
- Customer: Test_Customer is assigned to Subsidiary: USA where Currency = USD. However, on the Customer Record the Primary Currency = GBP.
- Currency Exchange Rate is 1 GBP = 1.25 USD. On the Sales Order, a user selects an Item and assigns Amount = 1000. Note that this is in fact GBP 1000.
NOTE: GL Impact will show 800 which is in USD (since Subsidiary = USA and Currency = USD). When a Revenue Recognition is selected for this Item, then the corresponding Revenue Recognition Schedule will show an amount of 800 which is in USD.
Remove Journals from A/R Aging Reports
1. Navigate to Reports > Customer/Receivables > A/R Aging > Customize Summary.
2. On the Filters tab > Unpaid ReceivablesTransactions folder > Choose Transaction Type (with the key icon) > thenin the Choose Filters at the right, set it to Not Equal To Journal.
3. Save.
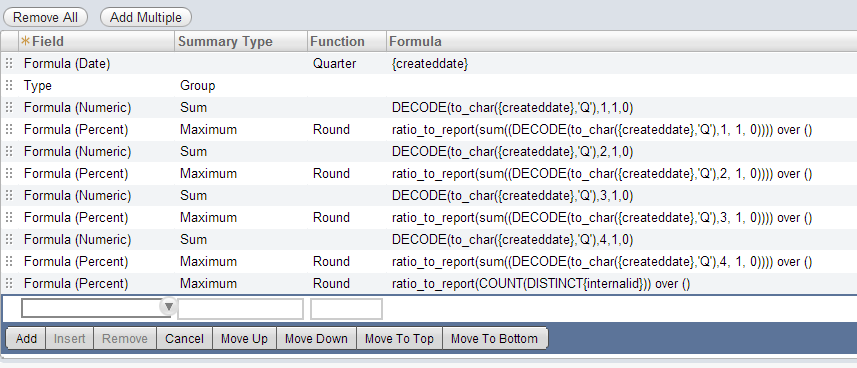
Saved search which computes rounded "% of Total" function
Users would like to create a Case saved search where the % of Total function and the Round function are used at the same time.
See the example of saved search which computes all Closed cases within the fiscal year divided into quarters against all cases in the fiscal year:
1. Navigate to the Lists > Search > Saved Searches > New > select type as Case.
2. On the Criteria subtab > Standard sublist set following:
Status = is Closed
Date Created = is within this fiscal year
3. On the Results subtab set following:
Divide cases into quarters:
Field = Formula (Date)
Function = Quarter
Formula = {createddate}
Customer Label = Quarter
Set the grouping of cases:
Field = Type
Summary Type = Group
Closed Cases in Q1 (numeric):
Field = Formula (Numeric)
Summary Type = Sum
Formula = DECODE(to_char({createddate},'Q'),1,1,0)
Summary Label = Q1
Rounded percentage of Closed cases in Q1:
Fields = Formula(Percent)
Summary Type = Maximum
Function = Round or Round to tenths (according to your requirements)
Formula = ratio_to_report(sum((DECODE(to_char({created},'Q'),1, 1, 0)))) over ()
Summary Label = Q1 %
Total percentage of closed cases within the fiscal year by Type of case:
Fields = Formula(Percent)
Summary Type = Maximum
Function = Round or Round to tenths (according to your requirements)
Formula = ratio_to_report(COUNT(DISTINCT{internalid})) over ()
Summary Label = Total %
See the picture below for all settings of the Results subtab:
Reminders Portlet Error
Users can experience the following situation when creating a custom Reminders portlet:
You cannot access this search because it includes restricted fields. Please contact your administrator.
You cannot access this search because it includes restricted fields. Please contact your administrator.
The error is most likely caused by any recent change to the search being used. Please contact your administrator.
Users can use following link to see the Set Up Reminders default page
to determine the search causing the error.
Note: Make sure the URL link is correct based on used data center.
Adaptive Insights: Activate plugins without Enabling Java on All Sites.
This article is intended for accounts integrated with Adaptive Insights, NetSuite's partner in delivering financial management solutions.
Users need to allow Java Plugin to be able to load sheets and applets in Adaptive Insights.
These plugins can be activated in the Adaptive Insights site without enabling Java on all sites.
- Navigate to the Address bar of the browser when accessing a site that requires a Java plugin and click on the red plugin icon.
- Under the Activate All plugins, choose Allow and Remember
Once this plugin has been activated in the Adaptive Insights site, this setting will be recalled by the system the next time the site is accessed.
Number of Attempts on Standard NetSuite UI login on SAML SSO Login
Standard NetSuite Login provides six attempts to enter the correct ID/password combination. After six unsuccessful attempts, the user is locked out for 30 minutes and the system administrator is sent an email.
This limitation does not apply when logging in through SAML SSO. There is no limit on the number of attempts for SAML SSO.
Display Shipment Number Barcode Instead of Sales Order Barcode on Packing Slip PDF Layout
1. Navigate to Customization > Forms > Transaction Form PDF Layouts.
2. Edit your custom packing slip layout.
3. Click Add Custom Element
4. Select Shipment# '{shipid}' and click OK.
5. Select the custom element and set Element Data Style to Bar Code. Drag the element to your desired position.
Monday, April 29, 2019
Remove the - New - option from drop downs for certain roles
Employees will see the - New - option in certain drop downs if they have the ability to create that type of record. To remove this the permission to create that type of record should be removed from the role or the Level should be set to View. This will also prevent employees with this role from being able to create records for that record type in all other ways.
Note: If the dropdown contains a custom list/record then the owner will always have permission to add new records so the new option will always show for that employee.
Check the User License Count
To view/check the user license counts, follow these steps:
1. Log in as Administrator.
2. Navigate to Setup > Company > View Billing Information > Billable Components tab.
3. Check Current Provisioned Qty and Current Used Qty for the Employee Center and Full Access User licenses.
Note: Should the user wants to request an additional license count provision, contact the Account Manager (AMO) or Sales Representative.
Third Party Security Audit Scan Fails for shopping.netsuite.com
Scenario:
Third party security audit firm's report shows that there is a vulnerability with NetSuite on port 80, IP 167.216.129.13 (shopping.netsuite.com).
Reason:
Point to be noted here is that shopping.netsuite.com is http meaning that it is not secure. Shoppers are automatically directed to secure pages, checkout.netsuite.com (https), as soon as they click on the "Proceed to checkout" button. Therefore when the security audit is executed on shopping.netsuite.com, it shows it as a vulnerability.
Solution:
Contact the third party security audit firm and inform them that shopping.netsuite.com is not a secure domain and therefore they need to perform a re-scan keeping this in mind.
Only Employees Show As Event Attendees in NetSuite iPhone Application
By default, when setting an event, the screen will show Employees as attendees.
Here is an important setting (prerequisite) if user wants to send event invites other than employees.
Using a regular Internet browser:
1. Log in to NetSuite
2. Under Home tab, click Set Preferences
3. Click Activities
4. Restrict Invitees to Employees = F
Using an iPhone, follow these instructions:
1. Log in to NetSuite for iPhone application
2. Tap Calendar menu
3. Tap the plus icon to add
4. Tap Event
5. Create an event then tap Save
6. Tap the Menu bar > Attendees
7. Tap Edit
8. Tap the plus icon to add
9. Tap Send Invitation To
10. Tap the filter (funnel icon) located at the top left corner on the screen
11. User should now be able to choose between Employees, Customer, Groups, Etc.
Create a Saved Search Which Displays Items, Quantity Received and Quantity Fulfilled on Separate Columns
An Item saved search does not have a column for Quantity Received and Quantity Fulfilled. The user can run a saved search instead, but the quantity values will appear as separate rows together with the related transaction.
What the user can do is to create a transaction search instead and employ a formula.
To create the Saved Search:
1. Navigate to Lists > Search > Saved Searches > New > Transaction
2. Under the Criteria tab > Standard sub tab, add the following:
FilterDescriptionFormulaAccount Type is Other Current Asset Date is <select a date range> Posting is true Location is <select a location>
3. Under the Results tab > Columns sub tab, add the following:
Field | Summary Type | Function | Formula | When Ordered By Field | Custom Label | Custom Label Translation | Summary Label | Summary Label Translation |
| Item | Group | |||||||
| Formula (Numeric) | Sum | CASE WHEN {quantity} > 0 THEN {quantity} ELSE null END | Qty Received | |||||
| Formula (Numeric) | Sum | CASE WHEN {quantity} < 0 THEN {quantity} ELSE null END | Qty Shipped |
4. Give it a name and Save.
CSV Import: Sales Order > To remove specific line item(s)
1. Create a CSV Import File with the following columns/values:
-Sales Order Internal ID
-Item Line ID (Refers to all Line Items to be retained)
*Users may create a Sales Order Transaction Saved Search to pull up above fields.
-Lists > Search > Saved Searches > New.
-Click on Transaction link.
-Under Criteria tab > Standard subtab > Add the following fields:
-Type = is Sales Order
-Main Line = is false
-Tax Line = is false
-Shipping Line = is false
-Under Results tab > Columns subtab > Add the following filters:
--Internal ID
--Line ID
-Edit the Search Title as desired
-Hit Save & Run
-Hit Export - CSV button to export the file.
-Modify the exported file to only show the row(s) referencing to the Item Line ID(s) to be retained after the import.
2. Navigate to Setup > Import/Export > Import CSV Records.
-Import Type = Transactions
-Record Type = Sales Order
-Character Encoding = Western (Windows 1252)
-Select One file to upload
-Next
-Data Handling = Update
--Under Advanced Options > Overwrite Sublists = True
-Next
-Map the following fields:
--Internal ID = Internal ID (Could be found under the Sales Order folder)
--Line ID = Items : Line Id (Could be found under the Sales Order Items folder)
-Next
-Enter an Import Map Name
-Hit Save & Run
Note: It is highly suggested to update one sales order record first to check on the result and for testing purposes.
CSV Import: Vendor Bill > To remove the Department/Location/Class field value(s) on Expense Line(s)
1. Create multiple CSV Import files:
*Primary File:
-Internal ID
*Expense File:
-Internal ID
-Line ID
-Department/Location/Class
*Users may create a Vendor Bill Transaction Saved Search to pull up above fields.
-Lists > Search > Saved Searches > New.
-Click on Transaction link.
-Under Criteria tab > Standard subtab > Add the following fields:
-Type = is Bill
-Account = is not (Select the Accounts Payable Account used for Vendor Bill records)
-Under Results tab > Columns subtab > Add the following filters:
--Internal ID
--Line ID
--Department/Location/Class
-Edit the Search Title as desired
-Hit Save & Run
-Hit Export - CSV button to export the file.
-Modify the exported file and set the Department/Location/Class field value(s) to Blank.
2. Navigate to Setup > Import/Export > Import CSV Records.
-Import Type = Transactions
-Record Type = Vendor Bill
-Character Encoding = Western (Windows 1252)
-Select Multiple files to upload
--Primary File – Vendor Bill
--Linked File (Optional) – Vendor Bill Expenses
-Next
-Data Handling = Update
--Under Advanced Options: Overwrite Missing Fields = True
-Next
-Primary and VENDORBILL:item (Linked File) = Internal ID
-Next
-Map the following fields:
--Internal ID = Internal ID (Found under Vendor Bill folder)
--Line ID = Expenses : Line (Found under Vendor Bill Expenses folder)
--Department/Location/Class = Expenses : Department/Location/Class (Found under Vendor Bill Expenses folder)
-Next
-Enter an Import Map Name
-Hit Save & Run
Change Purchase Request Form in Employee Center
Purchase request form in Employee Center role uses the Preferred Purchase order form. If the purchase request form has to be customized to show additional fields or hide existing fields, following are the steps to accomplish this.
1) Navigate to Customization > Forms > Transaction Forms.
2) Open the Standard Purchase order form by clicking on the Customize button.
3) Make changes to the form based on the requirements. You may add more fields or hide existing ones.
4) Save the form with a different name.
5) Navigate to Setup > Users/Roles > Manage Roles.
6) Open the Standard Employee Center role by clicking on the Customize button.
7) Click on the Forms sub tab.
8) You will see a list of Purchase order forms. Click the Preferred check box besides the one that you want to see in the Purchase Request.
9) Save the role with a different name.
10) Add the customized role to the Employee record.
Note: Once the employee logs in using the Employee center role, the preferred purchase order form chosen in the Employee Center role will appear in Purchase Request.
Subscribe to:
Posts (Atom)